A poinsettia is not just for Christmas

There’s a good chance you’ve bought a poinsettia for Christmas, either for yourself as a must-have addition to your Yuletide decorating, or for a friend or family member as a gift to brighten their day. Florists, garden centres and supermarkets are full of them in the run up to Christmas, and most of us can’t resist buying one.

Poinsettias are the perfect addition to Christmas decorations

Unfortunately, they have a bit of a reputation of being hard to care for – I have a friend who is delighted if hers lasts a week!

But follow 3 simple rules and your poinsettia should thrive through Christmas, and beyond.

  1. Keep it warm and out of draughts
  2. Give it bright light (but not direct sunlight)
  3. Keep the soil moist, but don’t overwater it!

What is a poinsettia?

The poinsettia (Euphorbia pulcherrima) is a member of the spurge family. It is native to Mexico and parts of central America, where it grows as a perennial shrub, reaching heights of 10–12 feet. Cuttings from the native plant were sent to the USA in 1828 by the first US Ambassador to Mexico, physician and botanist Joel Roberts Poinsett, and they have been widely cultivated across the globe ever since.

Poinsettias grown as shrubs or trees in their native Mexico
Poinsettias grow as shrubs or trees in Mexico

Poinsettias have small yellow flowers at the centre of showy coloured bracts (leaves). There are now over 100 cultivated varieties with various coloured bracts, including white, pink and marbled, but the red poinsettia remains the most popular choice in the UK at Christmas.

Poinsettia care: 3 top tips

Keep it warm and out of draughts. Poinsettias like a constant warm temperature of 15–22oC. Many shops put the plants near their doorways to tempt you to buy them on the way in or out, but this is the worst possible place for them in the UK, because fluctuations in temperature below 12oC (i.e. every time the door opens) will stress the plant; as a result, it will start to drop its leaves. This may well be the reason why so many plants struggle once you have brought them home, as they’ve already been stressed in the shop.

At home, you can put your plant near a radiator but make sure you keep it away from draughty areas like doorways, open windows and fireplaces.

Poinsettias also prefer humid conditions, so if you are keeping your plant in a very warm place, it is a good idea to mist it with water from time to time.

Give it bright but indirect light. Poinsettias prefer light to shady conditions, but direct sunlight can scorch the leaves. This shouldn’t be a problem in winter, but don’t put the plant on a south-facing windowsill in summer.

Where to place a poinsettia
This poinsettia did well in a south-facing position in my conservatory, but had to be moved later in the year away from direct sunlight

Keep the soil moist but not overwatered. Poinsettias do not like a lot of water. Try not to let the root ball dry out completely, but it is even worse to leave the plant sitting in water. If you do, the roots will rot and you’ll end up with a dead plant.

A wilting poinsettia is a sign of a draughty location or too much or too little water

If you’re not sure how much water to give your plant, I’d lean towards it being too dry. It seems to work for me. I wait until the top layer of soil has dried out before giving it a small amount of water, making sure that there is no excess water at the bottom of the pot.

Check the leaves regularly – if they are starting to curl or wilt, or they are dropping off, then you will need to adjust your watering regimen.

I’ve read that poinsettias prefer ‘soft’, warm water, but mine gets water out of the tap (which is both hard and cold), and it hasn’t seemed to do it any harm.

Poinsettia care after Christmas

Sadly, once poinsettias start to lose their colour towards the end of January, most are resigned to the rubbish or compost bin.

They don’t have to be thrown away though. They make a lovely house plant for the rest of the year and, with a bit of special attention, can be coaxed into turning red again in time for next Christmas.

My poinsettia from Christmas 2021

Here are a few tips to help your poinsettia thrive.

  • Continue providing it with appropriate warmth, light and water (as above).
  • In spring (April), reshape the plant by cutting the stems back to 4–6 inches; be careful to avoid the milky sap that will ooze from the cut stems, as it can cause skin irritation.
  • When new growth starts to appear, feed the plant monthly with a high potassium fertiliser, such as tomato feed.
  • As the plant grows, repot it into a bigger pot using a decent compost that provides good drainage; adding grit to the compost can help with drainage.

How to turn the leaves red in time for next Christmas

The bracts turn red by a process called photoperiodism, which means that they need a short day length (less than 12 hours of light) for about 8–10 weeks. The easiest way to reduce your plant’s exposure to light is to keep the poinsettia in a room that gets no artificial light from September onwards.

If that’s not possible, place your plant in the dark for about 14 hours every day (6pm to 8am), either in a warm cupboard or by blocking out the light with a cover. Make sure it gets a normal amount of light for the remaining 8 hours a day.

I gave this a go for a couple of weeks in early December, and the bracts did start to turn red. I didn’t start the process early enough this year, so I’m going to try again next year from September onwards.

How to turn your poinsettia leaves red in time for Christmas
My efforts to turn the leaves red this year started to work…I need to start the process earlier next year

#PoinsettiaChallenge2023

So, here’s my challenge. Don’t throw out this year’s poinsettia. Give it some TLC and join me in trying to keep it going through to Christmas 2023, and have a go at turning the leaves red again. Share your results on Facebook and Twitter using the hashtag above, and let’s see if we can give this year’s poinsettias a second chance of Christmas glory.

Compost composition

compost corner

Compost corner

Today, in between the rain showers, I dug out some compost to add to the flower beds. I found quite a decent amount of composted material at the bottom of the bin, but to be honest it is more slimy than crumbly.

I’ve done some research, and discovered I’m being too green!

‘Greens’ and ‘browns’

Ideally, compost should be a 50:50 balance between green and brown materials. The ‘greens’ are quick to rot and provide nitrogen and moisture, while the ‘browns’, which are slower to rot, provide carbon and fibre, and help air pockets to form.

To date, the bulk of my compost has comprised fruit and vegetable peelings/skins, used tea bags and grass mowings, so I need to change the balance a little. Of the ‘brown’ items in the lists below, I compost egg shells, used kitchen towels and a few leaves. From now on I’ll be adding egg boxes and other cardboard along with the contents of my vacuum cleaner (ew!), and next time my husband gets his hair clippers out, well …

Greens

  • Animal manure with straw
  • Coffee grounds
  • Comfrey leaves
  • Cut flowers
  • Fruit peel, cores and pulp
  • Grass mowings and hay
  • Old bedding and vegetable plants
  • Raw vegetable peelings/waste
  • Soft prunings, hedge clippings and plant debris
  • Tea leaves and bags
  • Urine
  • Weeds (see text)

Browns

  • Autumn leaves
  • Cotton wool and wool
  • Egg shells
  • Egg boxes and plain cardboard
  • Evergreen prunings
  • Hair
  • Natural corks
  • Paper bags
  • Straw
  • Sweetcorn cobs
  • Used kitchen paper
  • Vacuum cleaner contents
  • Wood ash

Composting weeds

I spend so much time pulling weeds out of the garden that the last thing I want to do is reintroduce weed seeds back into the soil. So it has been a bit of a revelation to find out that it’s okay to compost weeds, provided you follow a few simple rules. Before composting, make sure annual weeds:

  • haven’t yet reached the seed-bearing stage – so to be extra sure, I plan to add them to the compost before they have flowered
  • are not the type that propagate by runners.

Perennial weeds are a bit trickier. The roots of ground elder, couch grass, nettles, creeping buttercup, dandelion and docks can survive for a long, long time and will keep growing in the compost. If you’ve got the space then you should keep them in darkness for 2 years before adding to the compost, but for most of us it’s probably better to play it safe and only add the leaves of these plants –  not the roots!

You can make extra sure that you don’t spread weeds in your garden by practising ‘hot composting’, i.e. turning the pile regularly and ensuring it really heats up. One website that I visited suggested using a compost thermometer: a hot compost pile of 60–65 degrees C (140–150F) for several days, or 49 degrees C (120F) for a longer period, will kill any weed seeds. But, to be frank …  life is too short to be checking the temperature of my compost heap!

Failure is not an option

The good news is, you cannot fail with composting, because whatever you do …  it happens. Whatever composition and consistency you end up with, the addition of organic matter to your soil will benefit your plants. Compost improves soil structure and aeration. Importantly, for my garden, it loosens clay soil, and if you have sandier soil, the addition of compost will increase its water-holding capacity.

Ultimately, plants grown in compost-rich soil will be healthier and stronger, and will fruit and flower more. Oh, and you never know, there may be other benefits … it might make me vacuum more often!!

First-time leaf cuttings

According to those in the know, the best time to take leaf cuttings from marguerites (Argyranthemum) is mid-spring to summer … so, I’m a bit late! But seeing as there are still some decent-looking shoots on my one patio specimen I thought I’d give it a go before the first frosts hit. Here’s how I got on …

Argyranthemum leaf cutting - select a strong shoot
Select a strong shoot, and cut straight below a leaf joint
Argyranthemum leaf cutting remove lower leaves
Remove leaves from the lower third of the cutting
Argyranthemum leaf cutting - dip in rooting powder
Dip in water, then into rooting powder
Argyranthemum leaf cuttings
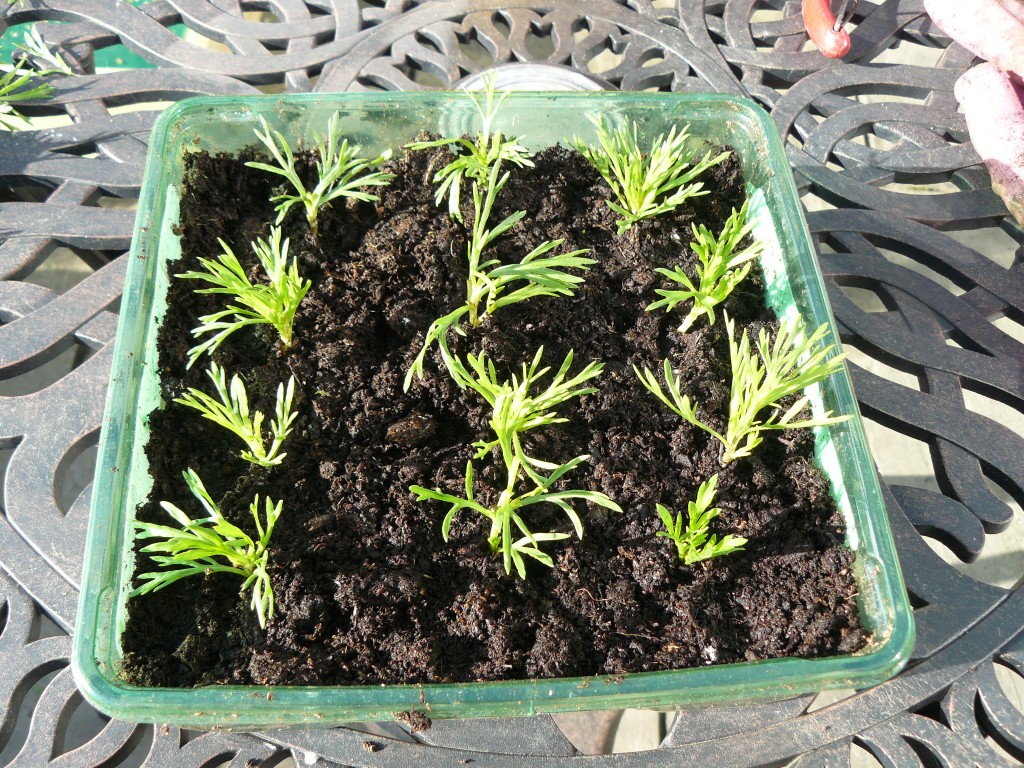
Plant immediately, spacing the cuttings so the leaves do not touch

The cuttings are now residing in my mini-greenhouse, so there should be enough humidity to stop the leaves drying up too quickly.

I’ve never taken leaf cuttings before, so this is a bit of an experiment for me. Please feel free to leave your comments – all constructive advice is most welcome!